Mikrotik DUAL WAN Load Balancing using PCC method

Written by computers on Wednesday, December 31, 2014 at 02:23

Now,I will try to share for about Load Balancing Mikrotik by using PCC method.

We can make these example IP's bellow
Local IP =192.168.0.1
DSL MODEM IP’S :
DSL MODEM 1 = 192.168.1.1
DSL MODEM 2 = 192.168.2.1


So, get the script now
/ip address
add address=192.168.0.1/24 network=192.168.0.0 broadcast=192.168.0.255 interface=Local
add address=192.168.1.2/24 network=192.168.1.0 broadcast=192.168.1.255 interface=WAN1
add address=192.168.2.2/24 network=192.168.2.0 broadcast=192.168.2.255 interface=WAN2

/ip dns set allow-remote-requests=yes cache-max-ttl=1w cache-size=5000KiB max-udp-packet-size=512 servers=221.132.112.8,8.8.8.8

/ip firewall mangle
add chain=input in-interface=WAN1 action=mark-connection new-connection-mark=WAN1_conn
add chain=input in-interface=WAN2 action=mark-connection new-connection-mark=WAN2_conn

add chain=output connection-mark=WAN1_conn action=mark-routing new-routing-mark=to_WAN1
add chain=output connection-mark=WAN2_conn action=mark-routing new-routing-mark=to_WAN2

add chain=prerouting dst-address=192.168.1.0/24 action=accept in-interface=Local
add chain=prerouting dst-address=192.168.2.0/24 action=accept in-interface=Local

add chain=prerouting dst-address-type=!local in-interface=Local per-connection-classifier=both-addresses-and-ports:2/0 action=mark-connection new-connection-mark=WAN1_conn passthrough=yes
add chain=prerouting dst-address-type=!local in-interface=Local per-connection-classifier=both-addresses-and-ports:2/1 action=mark-connection new-connection-mark=WAN2_conn passthrough=yes

add chain=prerouting connection-mark=WAN1_conn in-interface=Local action=mark-routing new-routing-mark=to_WAN1
add chain=prerouting connection-mark=WAN2_conn in-interface=Local action=mark-routing new-routing-mark=to_WAN2

/ip route
add dst-address=0.0.0.0/0 gateway=192.168.1.1 routing-mark=to_WAN1 check-gateway=ping
add dst-address=0.0.0.0/0 gateway=192.168.2.1 routing-mark=to_WAN2 check-gateway=ping

add dst-address=0.0.0.0/0 gateway=192.168.1.1 distance=1 check-gateway=ping
add dst-address=0.0.0.0/0 gateway=192.168.2.1 distance=2 check-gateway=ping

/ip firewall nat
add chain=srcnat out-interface=WAN1 action=masquerade
add chain=srcnat out-interface=WAN2 action=masquerade

add chain=prerouting dst-address-type=!local in-interface=Local per-connection-classifier=both-addresses-and-ports:2/0 action=mark-connection new-connection-mark=WAN1_conn passthrough=yes
add chain=prerouting dst-address-type=!local in-interface=Local per-connection-classifier=both-addresses-and-ports:2/1 action=mark-connection new-connection-mark=WAN2_conn passthrough=yes
add chain=prerouting dst-address-type=!local in-interface=Local per-connection-classifier=both-addresses-and-ports:2/2 action=mark-connection new-connection-mark=WAN2_conn passthrough=yes


ok,Good Luck
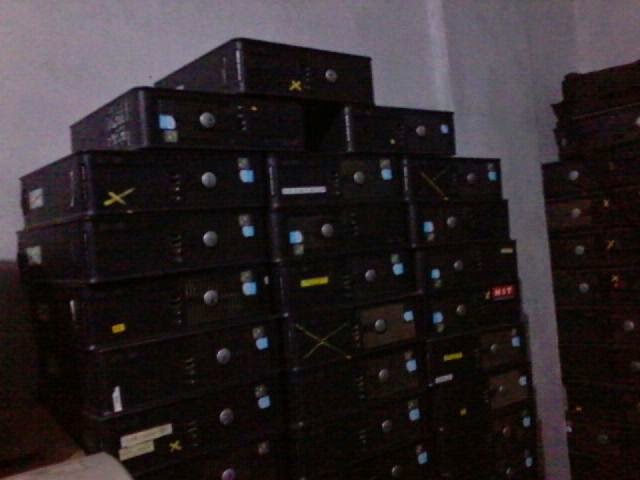
Jual PC Murah di Batam

Written by computers on Friday, December 26, 2014 at 23:47


Dijual Murah :

Desktop PC Branded Pentium D 3.4 Ghz
Ram 1Gb
Hardisk 80 Gb
Harga 600rb
stock banyak
Hub 081270058384

Jual Laptop  Murah Sony Vaio 


Dijual Laptop Sony Vaio 
Serie VGN-CR353  
Core 2 duo 2.10 Ghz
LCD 14.1
Hardisk 160 Gb
Ram 2Gb
Harga 2,1 Juta
Hub 0812 700 583 84

Load Balancing Mikrotik 2 ISP

Written by computers on Tuesday, October 09, 2012 at 17:27

 Load Balancing Mikrotik

it's easy to make load balancing use this methods and i am sure you're all
will not confuse to use it.
this is a simple Load balancing.

/ip firewall mangle
add action=mark-connection chain=input comment=”NEW Load Balance” connection-state=new disabled=no in-interface=\
pppoe-speedy1 new-connection-mark=ISP1 passthrough=yes
add action=mark-connection chain=input comment=”" connection-state=new disabled=no in-interface=pppoe-speedy2 \
new-connection-mark=ISP2 passthrough=yes

add action=mark-routing chain=output comment=”" connection-mark=speedy1 disabled=no new-routing-mark=ISP1 passthrough=\
no
add action=mark-routing chain=output comment=”" connection-mark=speedy2 disabled=no new-routing-mark=ISP2 passthrough=\
no

add action=mark-connection chain=prerouting comment=”" disabled=no dst-address-type=!local in-interface=local \
new-connection-mark=speedy1 passthrough=yes per-connection-classifier=both-addresses-and-ports:2/0
add action=mark-connection chain=prerouting comment=”" disabled=no dst-address-type=!local in-interface=local \
new-connection-mark=speedy2 passthrough=yes per-connection-classifier=both-addresses-and-ports:2/1

add action=mark-routing chain=prerouting comment=”" connection-mark=ISP1 disabled=no in-interface=local \
new-routing-mark=ISP1 passthrough=yes
add action=mark-routing chain=prerouting comment=”" connection-mark=ISP2 disabled=no in-interface=local \
new-routing-mark=ISP1 passthrough=yes

and then --> /Ip Firewall NAT

/ip firewall nat
add action=masquerade chain=srcnat comment=”masquerade lokal network” disabled=no src-address=”local Ip ”

/Ip route

/ip route
add comment=”" disabled=no distance=1 dst-address=0.0.0.0/0 gateway=pppoe-speedy2 routing-mark=ISP2
add comment=”" disabled=no distance=1 dst-address=0.0.0.0/0 gateway=pppoe-speedy1 routing-mark=ISP1
add comment=”" disabled=no distance=1 dst-address=0.0.0.0/0 gateway=pppoe-speedy1
add comment=”" disabled=no distance=1 dst-address=0.0.0.0/0 gateway=pppoe-speedy2


good luck......

Notebook and Netbook

Written by computers on Friday, May 25, 2012 at 18:16

What are you looking for?You can find everything here

Just visit here

Mikrotik and Internal Web Proxy

Written by computers on Friday, March 23, 2012 at 01:57


Mikrotik and Internal Web Proxy
First,We have to enable web proxy Mikrotik
/ip web proxy


Next step is Setting up your Firewal
/ip firewall Nat
add chain = srcnat action = masquerade
out interface = Public


add chain=dstnat action=redirect to-ports=8080 protocol=tcp src-address=Your Local Ip Address in-interface=LAN dst-port=80

Then setting up on Ip Firewall mangle

0 ;;; HIT TRAFFIC FROM PROXY
chain=output out-interface=lan
dscp=4 action=mark-packet
new-packet-mark=proxy-hit passthrough=no


1 ;;; UP TRAFFIC
chain=prerouting in-interface=lan
src-address=192.168.0.0/24 action=mark-packet
new-packet-mark=test-up passthrough=no
2 ;;; CONN-MARK
chain=forward src-address=192.168.0.0/24
action=mark-connection
new-connection-mark=test-conn passthrough=yes
3 ;;; DOWN-DIRECT CONNECTION
chain=forward in-interface=public
connection-mark=test-conn action=mark-packet
new-packet-mark=test-down passthrough=no
4 ;;; DOWN-VIA PROXY
chain=output out-interface=lan
dst-address=192.168.0.0/24 action=mark-packet
new-packet-mark=test-down passthrough=no


Setting Simple Queue for each Client

name=”Client 1″
target-addresses=192.168.0.21/32
dst-address=0.0.0.0/0
interface=all
parent=none
packet-marks=test-down
direction=both
priority=8
queue=default-small/default-small
limit-at=0/0
max-limit=128000/384000
burst-limit=0/0
burst-threshold=0/0
burst-time=0s/0s
total-queue=default-small

Let's try and leave a comment here.thanks

Jasa Instalasi Warnet

Written by computers on at 01:29


Anda ingin membuat usaha Rental warnet,Segera hub kami.Kami menyediakan Jasa instalasi dan maintenance untuk warnet.harga untuk 1 unit computer branded second dengan spesifikasi:

pentium 4 ,Ram 1Gb ,Hardisk 40-80Gb ,vga onboard ,Lcd 17 Inc ,keyboard&mouse
harga Rp.1.300.000

Hub.0812 700 58384
Neotech Computers Services ,Kota Batam,Kepulauan Riau Indonesia (NCS)

Remove Virus Shortcut

Written by computers on Tuesday, November 08, 2011 at 20:44

there are 4 Shortcut here and comes from your usb flasdisk
Copy of Shortcut to (1).lnk
Copy of Shortcut to (2).lnk
Copy of Shortcut to (3).lnk
Copy of Shortcut to (4).lnk
1 of folders (Recycle Folder) may contains many files
and now,how to remove it from our computers?
try to use Ezet NOD32 On Demand Scanner,you can found it here

Optimasi Games Online

Written by computers on Friday, November 26, 2010 at 00:27

optimasi point blank di Mikrotik


Pertama setting di firewall

/ip firewall mangle
add action=mark-connection chain=forward comment="Trafik Mark" disabled=no new-connection-mark=all_con passthrough=yes src-address=192.168.0.0/24
add action=mark-connection chain=forward comment="" connection-mark=all_con disabled=no dst-port=39190-49100 new-connection-mark=pb-con passthrough=yes protocol=tcp src-address=192.168.0.0/24
add action=mark-connection chain=forward comment="" connection-mark=all_con disabled=no dst-port=39190-49100 new-connection-mark=pb-con passthrough=yes protocol=udp src-address=192.168.0.0/24
add action=mark-packet chain=forward comment="" connection-mark=pb-con disabled=no new-packet-mark=point-blank passthrough=no
add action=mark-packet chain=forward comment="" disabled=no new-packet-mark=all_packet passthrough=no

trus setting di Queqe tree


/queue tree
add burst-limit=0 burst-threshold=0 burst-time=0s disabled=no limit-at=0 max-limit=768k name="Download" parent=ether2 priority=8
add burst-limit=0 burst-threshold=0 burst-time=0s disabled=no limit-at=0 max-limit=0 name=HTTP packet-mark=all_packet parent="Download" priority=8 queue=default
add burst-limit=0 burst-threshold=0 burst-time=0s disabled=no limit-at=0 max-limit=0 name="Point Blank" packet-mark=point-blank parent="Download" priority=7 queue=default


semoga bisa berguna
maaf kalau masih salah,mohon untuk dikoreksi
Trims

Load Balancing Mikrotik

Written by computers on Wednesday, November 03, 2010 at 02:37

Simple Load Balancing Mikrotik

Loadbalancer mikrotik harus ada 3 Lancard, jika menggunakan RB750 malah lebih simple. Mungil, OS MK Versi 3.29, ada 5 port LAN, upss.. pokok e mak nyuss…. Jika mnggunakan PC ya harus 3 Lancard.

Ok, konfigurasi nya tidaklah terlalu sulit. Jika sudah running MK anda tinggal tambahkan 1 Lancard lagi.

Langkah-langkahnya

Jika anda berlangganan 2 ISP yang berbeda maka loadbalancing lah yang perlu kita lakukan, artinya kita menggabungkan 2 bandwiith yang berbeda tersebut dan di kluarkan menjadi 1 bandwith ke client.

IP eth1 isp1

iP eth2 ip2

ip eth3 ip local ke client

misal nya :

ip eth1 =123.123.123.123/29 gateway 123.123.123.122

ip eth2 = 122.122.122.122/29 gateway 122.122.122.121

ip eth3=192.168.1.254/24

skenario nya adalah ISP_2 dijadikan internet utama, Setelah mengkonfigurasi ip dan gateway 122.122.122.121, langkah selanjutnya adalah masuk winbox, klik menu ip routes, kmudian dobel klik gateway (122.122.122.121) kemudian klik panah kecil kebawah, isikan ip gateway 123.123.123.122 sehingga akan ada 2 ip gateway disana, selanjutnya klik apply, OK.

Berikutnya liat di menu ip firewall NAT, nah disitu ip 122.122.122.122 pada ether2 yang sudah di nat di kopi paste, kmudian arahkan paste tersebut ke ether1, sehingga kedua ip ether1 dan ether2 di masing-masing di NAT.

Langkah berikutnya ke menu queue tree, settinglah untuk download ke ip ether3 (ip lokal) dan untuk upload ke ip ether1.


selamat mencoba

Mikrotik Download

Written by computers on Friday, September 24, 2010 at 02:09


Mikrotik Download

Mikrotik is a part of Linux OS,many people use it for server so the internet connection will be more fast and we can manage our network connection.


if you wanna try to use it,you must be carefull or you will be sick...,he he he
I mean it's so dificult thing,but you may try,try and try again.
good luck....

Install Mikrotik

Written by computers on at 01:31


Install Mikrotik

How to install Mikrotik as Server??Let's try to learn together,OK ???

firstly,we have to looking for 1 unit of cpu,it can be Pentium III or Pentium IV with 2 Lancard.
insert Mikrotik CD to the cdroom,Setting boot to CDROOM,choose a for all services what your choices,then press i to install it,then follow the steps untill press ENTER to reboot your pc,You have to remove your Mikrotik CD from CDROOM.

Configuration Mikrotik

Login Mikrotik
user : admin
pass : admin

Firstly ,type /interface print to overview you lan card
type /setup
choose ip address then you make an ip address for your local network
for example 192.168.1.1/24
network 192.168.1.1
Broadcast192.168.1.100
secondly ,setting your DNS IP: IP-DNS-Setting
example:203.130.194.74
202.134.0.135
third ,Setting Your DHCP Server
IP-DHCP Server
Klick Setup then Next-Next ,untill successfully

Fourth ,Setting Your firewall
IP-Firewall then choose Nat
Klick +(Plus)
choose srcnat,action masquerade

and the last setting is make your dial up Modem
Klick ppp-choose PPOE Client then you have to insert you username of Speedy the the password too.

Generic Host 32 Error

Written by computers on Tuesday, November 17, 2009 at 09:26


This is a kind of Trojan attack on Network cause Stop Connection to acces Internet.if you wanna resolve it Do it immediatelly.
First,Unplug Lan cble(Internet Connection) then Klick Start-Run-Type Regedit
Then Choose HKLM-SYSTEM-Current Control Set-Services-NetBT-Parameters (in the Right Box
choose TransportBindName and delete value data of it.
Next Step HKLM-Software-Microfoft-Ole (in the right Box Choose EnableDCOM and change the value from Y to N.After close Regedit Restart your PC,and You can use Internet as well as possible.

Remove ~A~m~B~u~R~a~D~u~L~ Virus

Written by computers on Wednesday, September 09, 2009 at 02:30

If we wanna remove the virus,we have to use:
1.Hijack this
2.The Killer Machine
3.Fix Regitry
and the process is

1.Turn off system Restore
2.Run Hijack this to find the first file of virus
3.Run The Killer machine to remove all of virus
4.Run again Hijack This to remove virus from startup menu

in many case,hijack this program make our computers hung,so to end the process just kill it by task manager.After finishing the steps above,use repair.inf(right klick then choose install)
Good Luck


Error Generic Host 32

Written by computers on Tuesday, June 30, 2009 at 03:49

Error Generic Host 32

It's make trouble to internet connection ,and we have to restart our pc if we wanna use internet connection,so how to fix it??

there are 2 solutions here

1.First Tips
Start - Run - Regedit
HKEY_LOCAL_MACHINE>SYSTEM>CurrentControlSet001>Services>Browser>Parameters
Find the Key below:
Name : IsDomainMaster
then set it false
Then Restart Your Computers
2.Seconds Tips
Start - Run - CMD Press Enter
Type netsh press enter
Type winsock press enter
Type Reset Press Enter
Then Restart Your PC

Good Luck..............

Connect PC to PC

Written by computers on Wednesday, June 24, 2009 at 11:39


If you have two or more Computers in your home and you'll make a share it with other
you may try this way.

Open My Network Places - Create a connection - Welcome to the New connection Wizard (Klick Next) - choose Set up an advanced connection (next)- Connect directly to another computer (Next)- you have choose which one the role for this computer (Host or Guest)then you have to select the Cable connection.If you select the fisrt computers as Host you must make sure the other computer as user.You can see the the scheme of Lan cable below.


Remove BULU BEBEK Virus

Written by computers on Monday, June 01, 2009 at 23:46

Bulu Bebek Virus is as the same of other dangerous Virus,its almost the same with "COPY EXE" Virus,it's really make us crazy......How to remove it?????

there are many steps here:

1.Turn off your System Restore
2.Run Process XP to see the first BULU BEBEK virus File
3.Run The Killer Machine to remove first BULU BEBEK virus File
4.Run Search to find the duplicat of Virus(exe file-Icon=folder-size 53kb)
5.Run Registry Fx(from Ansav Standar/Antivirus -Plugin) to Repair Registry
6.Repair Cmd

good Luck

Show Hidden Files

Written by computers on Thursday, April 30, 2009 at 19:43

How to enable hidden Files


We know that many virus is running by the internet connection,it can be dangerous virus or a damn litle virus.But,two kind of virus was exactly dangerous for our windows operating system,So...,How to solved it??

Firstly,You have to enable your hidden file option(on the windows task bar)tool-folder option-view-Hidden files and folder then unmark HIDDEN EXTENSIONS FOR KNOWN FIE TYPES-unmark HIDE PROTECTED OPERATING SYSTEM FILES)If it can't done you may try ANSAV antivirus(you can download it in the antivirus Download bellow),how to use it??

Enable show hidden files by Ansav Antivirus

Run Ansav ,then Klick Plugin - Hidden Revealer-select target to be reveal-then klick start.After the process finish,check it out,Your Hidden system file will be appear.

Remove Autorun Virus

Written by computers on Tuesday, April 28, 2009 at 21:26

How to remove Autorun virus


What's that,Body?I think you're all know about this,isn't it?If we have a removable disk(USB Flasdisk,Memory Card) a problem will be appear,sometimes maybe.Try to plug your Removable disk to your Computer,if ijavascript:void(0)n the autoplay dialog appear "Run The Program" DON"T TRY to Klick OK,but Klicks Cancel,Because if you klick OK,the VIRUS from inside of The removable disk will Run automaticly,believe me people.If the kind of virus is a litle Damn Virus,it will be Ok,but if it's a Dangerous Virus you can be stress,Your computer may can restart ASAP.

How to Kill it???

Ok Body,just straight to the topic now.After you cancel the autoply your removable disk,klick your Computer,then in the task bar klick TOOL-FOLDER OPTION-VIEW.then in the box HIDDEN files and Folder Choose SHOW HIDDEN FILES AND FOLDER.then UNMARK hide extensions for unknown file types and then UNMARK hide protected operating system files. Then Klick OK.
The last important is change your removable Disk name.then open it up by using right klick on your mouse(Explore).Then after opening your removable disk,you can see
the autorun files and .....exe files,just deleted both of files,then closed your removable disk.safely your removable disk,unplug it,then plug it again,I am sure in the autoplay dialog won't appear Run the Program.

Remove Virus

Written by computers on Monday, April 27, 2009 at 21:05

Our Solutions

Many Big Antivirus Company launch Antivus programs such as McAfee,Nod32,Kaspersky,Avast,Norton and etc.But is it enough to protect or Computer programs from Virus???You may answer it yourself.
We should know that each Antivirus may have a weakness,yes it’s true.
For example A antivirus can Kill Brontoks Virus,but it may can’t Kill others virus.From this case we know that Our Computers is still danger,so how to Resolved it????

Virus make our program be slow and sometimes our progams couldn’t Run.
We better check our programs who runnings.Check it out by TASK MANAGER.You can see all programs Run by our operating system.Check your start up on your operating system by klick RUN – Type msconfig,in the
Startup you can disabled your unwanted programs may contain Virus such as CKVO,MKAVO etc.Always update your Antivirus Software ,and don’t try to use 2 or more Antivirus software,One Antivirus Software is enough or your Operating system will be more slow.

About the author

This is the area where you will put in information about who you are, your experience blogging, and what your blog is about. You aren't limited, however, to just putting a biography. You can put whatever you please.